Have you ever needed to automate the creation of a large number of similar records in a ServiceNow table? Do you wish you could easily cherry-pick data from the rows in an Excel spreadsheet or Pandas DataFrame and transform the data into new ServiceNow table records? SNulk, the ServiceNow Bulk Submit Tool for Table Records, was designed with these problems in mind.1 SNulk is a solution that automates the creation of similar table records for ServiceNow power users. It provides a means to effortlessly submit large numbers of templated records to a table on a ServiceNow instance based on provided data. The table, instance, template, and data are all customizable and intended to be modified to fit the situation.
This post introduces SNulk and its data submission capabilities. First, the post discusses SNulk’s design and functionality at a high level. Next, the post compares SNulk’s capabilities to those currently available in the ServiceNow GUI. Finally, the post educates the reader on using SNulk by providing an example of how to use SNulk to submit data to a table on a ServiceNow instance.
An Overview of SNulk
SNulk is a Python tool that makes it easy to submit a large number of table records to a table on a ServiceNow instance.1 Submissions through SNulk are templated, reusable on multiple similarly formatted data sources, and transmitted to ServiceNow instances using the PySNC library.2 SNulk can be used as either a CLI tool or as a library for other Python tools. Both uses of SNulk require the same input files:
- One or more tables where each row represents data for a new record in the ServiceNow table
- YAML file templates that define ServiceNow table structures
- YAML file templates that define how to map the input data table to the ServiceNow table structure
Under the hood, SNulk uses Pandas to load and manipulate data before submission. As such, when SNulk is used as a library, any Pandas DataFrame can be used to supply SNulk with the input data. However, the CLI tool is currently limited to only sourcing the input data from Excel spreadsheet files.
The templates are defined through two different types of YAML config files: one that defines the table structure on a ServiceNow instance and the other that defines the submission format and mappings from input data fields to ServiceNow fields. The struct YAML files are a list of available fields for a table on a ServiceNow instance. Optionally, allowed values for those fields may be specified. The format YAML files are where the actual customization of submitted records occurs. These files map a column(s) in the provided input data to a field in a ServiceNow table. It is possible to provide default values for a given field as well as define formatted strings containing runtime data substitutions. Moreover, by appending a hash to fields, SNulk is capable of detecting duplicate records in a table both during the current submission process and in future submissions made by SNulk. Additionally, one can supply a list of return fields to retrieve data from a ServiceNow table after a record has been submitted. The retrieved data is recorded in the originating data source row.
Requirements to run SNulk, the configuration options, and more will be explained in detail in the remaining sections of this post. A complete list and additional details on the options for the YAML file templates can be found in the SNulk Readme file.3 SNulk’s Readme file also contains a number of examples of how to run SNulk both as a CLI tool and as a library, along with the options associated with both. Example YAML snippets can be found in the Readme, with full examples being in the SNulk Github repo.4
SNulk VS GUI Import
ServiceNow supports the import of table data from spreadsheets and other files using the GUI. This is a three-step process that involves:
- The import of data from a file into a temporary table
- The definition of a transformation that maps the data in the temporary table to an existing table
- The transfer of data between the two tables using the transformation.
This process is primarily intended to be used by GUI and is difficult to automate.
SNulk, while similar to existing table import functionality, differs in several key areas. First, SNulk is entirely written in Python and intended to be used separately from the ServiceNow GUI. As such, SNulk can be used as part of other Python scripts, shell scripts, and automation efforts with limited user interaction once configured. Secondly, SNulk can be used to combine table columns into simple pre-formatted strings during import. While ServiceNow imports via the GUI do support this through scripted data transformations, SNulk’s pre-formatted strings are easier to understand and define. Third, SNulk is able to retrieve data upon the submission of a new record and write it back to the originating input data. Such functionality is not supported on ServiceNow instances via the GUI import process. Finally, SNulk is capable of detecting duplicate record submissions, a feature that is also not supported by the GUI import process.
Using SNulk for Table Record Submissions
The process of using SNulk to submit input data to a table on a ServiceNow instance can be divided into the following four steps.
- Obtaining access to a ServiceNow instance
- Constructing a
structYAML file for the table to which data will be submitted - Creating a
formatYAML file to map input data to fields in the ServiceNow table - Running SNulk to submit input data to a table on a ServiceNow instance
The remaining section discusses each of these steps in detail using the incident table on a ServiceNow developer instance as an example.
Obtaining an Instance
First, access to a ServiceNow instance must be acquired. Follow the steps below to obtain a temporary ServiceNow developer instance. Note these steps can be skipped if access to a ServiceNow instance with the incident table is already available.
- Go to https://developer.servicenow.com/dev.do and log in.
- Select
Start Building.
- Select
Xanadu(A) ->Request(B). IfXanaduis no longer the latest release then select the latest release.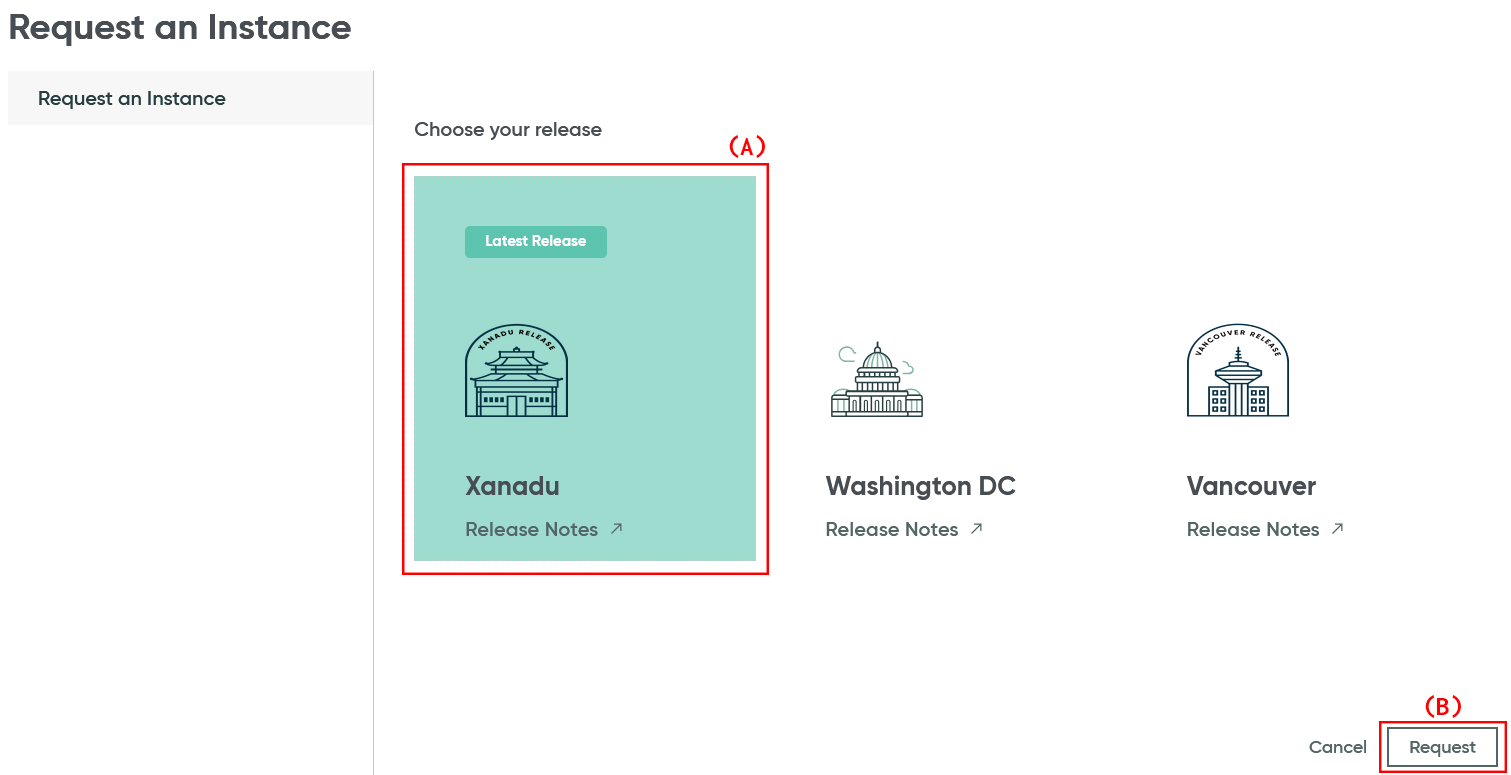
- Wait for the instance to be set up. This could take a while.
- Once the instance is set up a dialog will display with information about the instance. Record the Username (A), Password (B), and Instance Name (C), and select
Open Instance(D).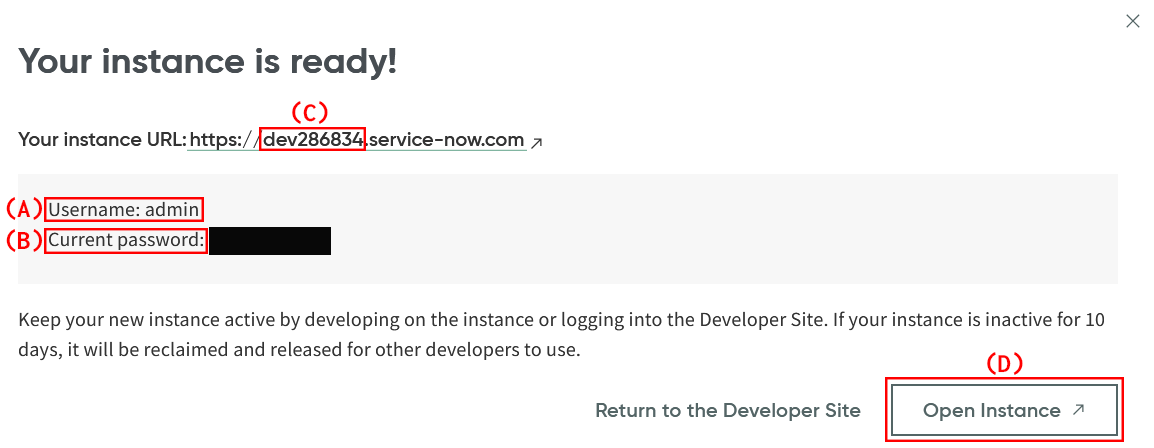
Generating a struct YAML File for the incident Table
Once a ServiceNow instance has been obtained, the next step to using SNulk is to create a struct YAML file for the table for which data will be submitted. The following steps below illustrate how to create a struct YAML file for the incident table on a ServiceNow developer instance. However, they should be applicable to a table on any instance.
Option 1 - Determining Table Fields and Values From sys_db_object
The sys_db_object table provides information about the structure of other tables on a ServiceNow instance. The table definitions found in the sys_db_object will list all possible fields for a table, so this is a good way to find fields that are not always displayed to end users. However, sys_db_object is not accessible to all users.
If sys_db_object is accessible, follow the steps below to examine the Category field of the incident table. Repeat these steps with a different field name for each field of a table that will be submitted using SNulk.
-
To access data from
sys_db_objectfor the Category field, navigate to https://[instance-name].service-now.com/now/nav/ui/classic/params/target/sys_db_object_list.do, search forincident, and select the first result.
-
Once on the
incidenttable definition page, search forcategoryunder columns. Select the first result to get to the field definition.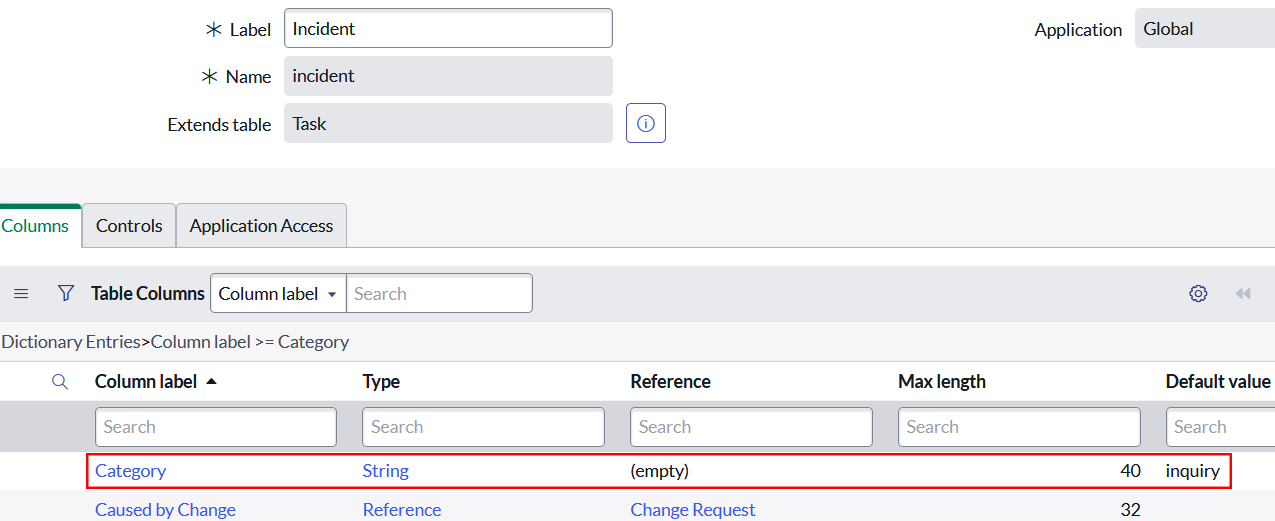
-
The Category field id (A) and the possible values for the field (B) are listed on the field definition page along with other information for this table field. As shown, the Category field has id
categoryand possible valuesinquiry,database,software,hardware, andnetwork.
Both the id and its possible values will be needed when constructing thestructYAML file for theincidenttable. Make a note of the id and all its possible values for later.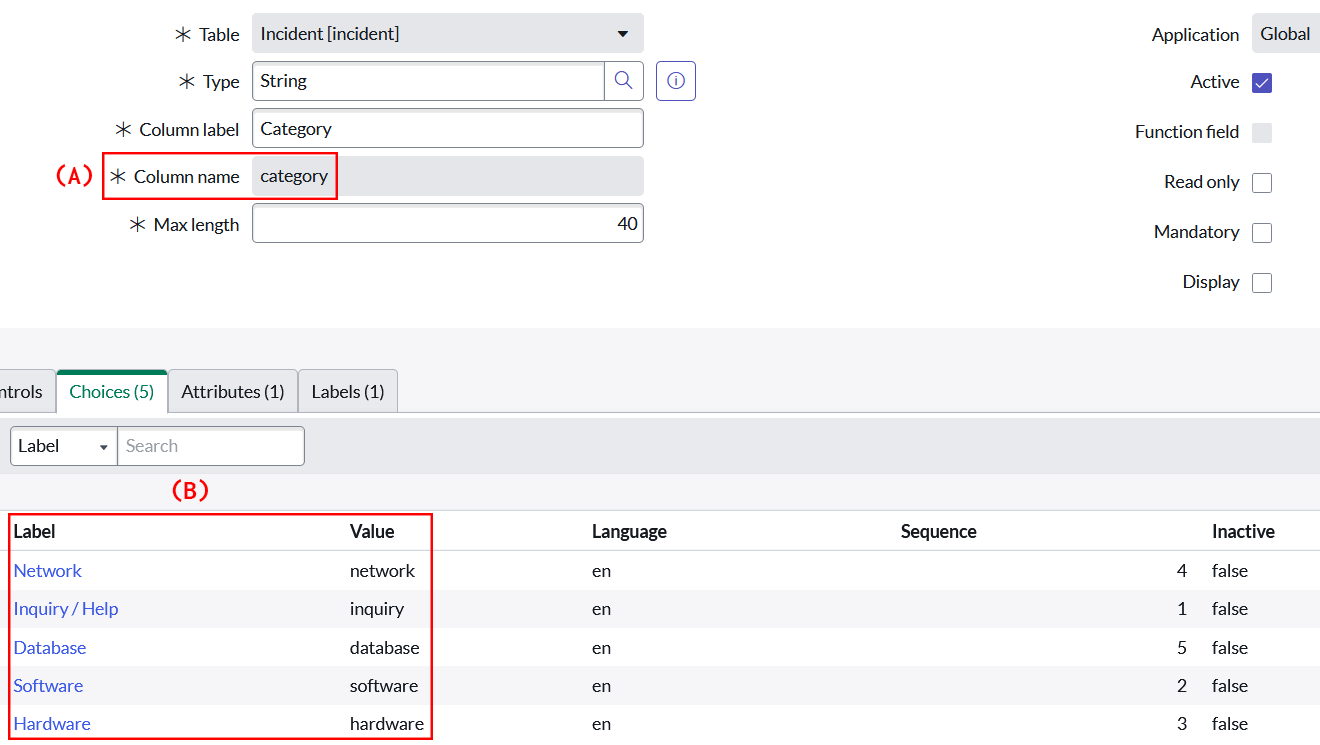
Option 2 - Determining Table Fields and Values Through Inspection
Alternatively, similar information can be found by inspecting a ServiceNow table’s new record page. Generally, if a user is able to write to a table, they are capable of viewing the table’s new record page. At the very least, a table’s new record page will have information about some of the most important fields of a table. However, the new record page of a table is not guaranteed to reference all available fields. Some may be hidden for automation or security reasons. As such, while the information available is limited, this method is useful when sys_db_object is not accessible.
If sys_db_object is not accessible, follow the steps below to determine the fields of a table and their possible values.
- Navigate to the
incidenttable’s list page on the instance. This can be found at the following url https://[instance-name].service-now.com/now/nav/ui/classic/params/target/incident_list.do. Replace[instance-name]with the name of the instance being used. - Select
newin the top right corner of the webpage. This new page gives a general idea of the fields that can be submitted to theincidenttable and their possible values. - For each field that is to be submitted, right-click on the field and inspect the element to get its id and a list of possible values. Both the id and its possible values will be needed when constructing the
structYAML file for theincidenttable. Make a note of all ids and associated possible values for later.
For example, take a look at the Category field (A) once again. As shown, the Category field has idcategory(B) and valuesinquiry,database,software,hardware, andnetwork(C). This is the same information that can be obtained from thesys_db_objecttable.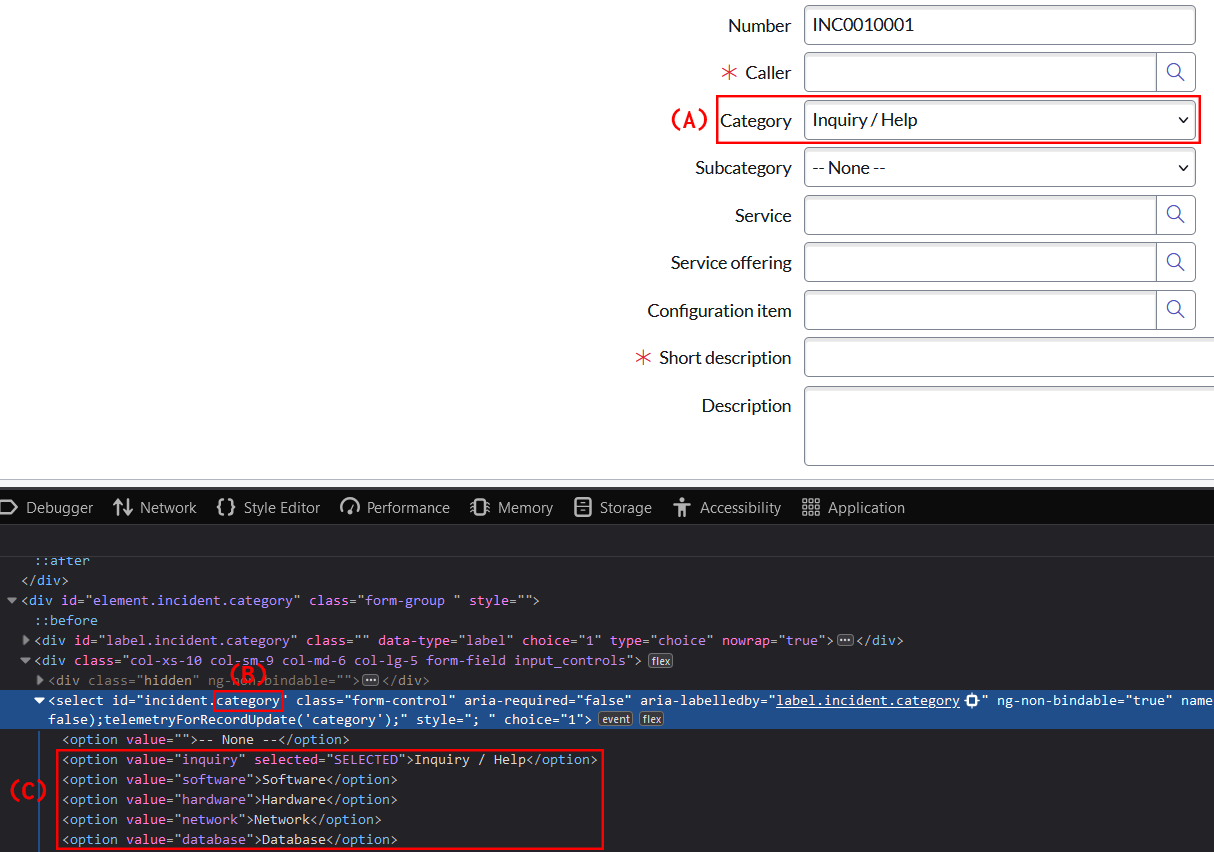
Constructing a struct YAML File
Once all the necessary field information has been retrieved for the table, the information must be transferred into the struct YAML file. Be sure to include all fields of the table that are to be submitted or read from by SNulk (except for sys_id). This alerts SNulk to the possible fields of the table. Any field not in the struct YAML file but referenced by the format YAML file will generate an error. The definition for the structure of the struct YAML file can be found in the SNulk Readme file3. A snippet of the struct YAML file for the incident table is shown in the figure below. The full YAML file can be found on the SNulk Github repo5.
An Example struct YAML File for the incident Table
---
instance: dev286834
table: incident
fields:
  - name: number
  - name: caller_id
  - name: category
    possible_values:
      - id: 'inquiry'
        short_description: 'Inquiry / Help'
      - id: 'database'
        short_description: 'Database'
      - id: 'software'
        short_description: 'Software'
      - id: 'hardware'
        short_description: 'Hardware'
      - id: 'network'
        short_description: 'Network'
An example of a struct YAML file for the incident table of a ServiceNow developer instance. The YAML file requires the definition of an instance name, table name, and non-empty list of field names for the table. The information displayed in this figure corresponds to information retrieved in previous sections.
As shown in the example, for the Category field of the incident table, the field id category is mapped to the tag name. A tag of name in the struct YAML file indicates a new field entry in the list of fields. Below the name tag for the Category field is a list of possible values for that field. Here, the id tag maps to an actual value for that field and the short_description tag maps to the label for that value (i.e., what will actually be displayed on the webpage). The list of possible values (i.e., possible_values) is an optional entry for each field entry. Omitting such data just means SNulk will not be able to check if a value is allowed for a field before submission.
Generating a format YAML File for the incident Table
Once the struct YAML file has been created for a table, the next step is to create the format YAML file that maps the table fields to the input data. The figure below illustrates how to define such a file for the incident table of a developer instance and the example test submission data found in test_submit.xlsx on the SNulk Github repo.6
As shown, the format YAML file has a similar base structure to that of the struct YAML file. Both require one to specify the instance, and table, and provide a list of fields. Additionally, for format YAMLs, one must provide a short_name for the file. The short_name is used by SNulk to identify the specific format file that will be used to submit data during a given run.
For each entry in the list fields, a name must be provided. The name is the name of a field in the ServiceNow table. As previously mentioned, any table field (i.e., name) included in the format YAML file must also be defined in the struct YAML file. Additionally, a data_key can be provided, which indicates the column in the input data that maps to this ServiceNow table field. The data_key is not required as long as a default_value is defined for the field. If both the data_key and default_value are defined for a field, SNulk will first examine the input data to determine if: 1) the column exists and 2) the data in the column for a given row is not empty. If both conditions are true, the data from the column is used during submission; otherwise, the data from the default_value is used. Note a value is considered empty if it is non-existent (e.g., none, NaN, null), an empty string, or a string containing only whitespace. If both the values from data_key and default_value evaluate to empty, an exception will be thrown. However, if required is set to false for a field and both data_key and default_value evaluate to empty for some row from the input data, the field will not be included in the record submission for that row.
An Example format YAML File for the incident Table and Test Data
---
short_name: test_incident
instance: dev286834
table: incident
return_fields:
  - name: __SYSID__
    data_key: 'Incident SysID'
    none_is_empty: true
  - name: number
    data_key: 'Incident Number'
    none_is_empty: true
fields:
  - name: caller_id
    default_value: '6816f79cc0a8016401c5a33be04be441'
    required: true
  - name: category
    default_value: 'inquiry'
    required: true
  ...
  - name: impact
    data_key: impact
    default_value: '3'
    required: true
  ...
  - name: description
    default_value: |
      Description
      ----------------
      The `[!--instance_name--!]` is not accessible on the URLs listed below. It has been down since [!--timestamp--!].

      Affected URL
      ------------------
      [!--instance_url--!]


    required: true
    substitution: true
    append_hash: true
  - name: problem_id
    data_key: problem_id
    default_value: ' '
    required: false
An example format YAML file for the incident table of a developer instance that maps the table’s fields to the input data from test_submit.xlsx.6 This snippet illustrates the configuration options available for format YAML files. A full version of the file can be found on the SNulk Github repo.7
For example, take the fields category, impact, and problem_id of the incident table in the figure above. All newly submitted records will contain a value of inquiry in the category field. However, for the field impact, the value for a given record will be 3 if the column impact in the input data is empty for the associated row. Otherwise, it will be whatever value the input data contains for that column and row. On the other hand, the field problem_id will be omitted from all record submissions unless the column problem_id contains non-empty data for a row from the input data.
Using SNulk to Submit Test Data to the incident Table
In addition to the format YAML options already mentioned for field entries, the description field in the above figure illustrates two additional features of SNulk. First is the substitution option. By default, the value of default_value is treated as a string literal. However, when substitution is set to true, sub-strings formatted like [!--column_name--!] will be replaced with the value of column column_name in a given row of the input data. This allows for additional formatting and data processing to be performed on the input data by SNulk. For the field description, the values of columns instance_name, timestamp, and instance_url for a given row of input data are all being substituted into the default_value. Second is the append_hash option. When the append_hash option is set to true, this indicates that all data to be submitted as a table record is to be hashed. The hash is then appended at the end of the value for the field description. This allows SNulk to check for and warn users of duplicate records in the existing records of a table before submitting a new table record.
Lastly, SNulk has the ability to retrieve data created by a ServiceNow instance after a table record has been submitted. The data can be mapped back to columns in the input data by creating field entries in the return_fields of the format YAML file. The format of return_fields is similar to that of normal fields. Mainly, name indicates a field in a ServiceNow table and data_key indicates a column in the input data. However, for the entries in return_fields, a data_key is required for each entry. The figure above illustrates how to define return_fields entries for the incident table. By default, SNulk will always retrieve the sysid of a submitted record and record it in the input data under the column Submit SysId. This is to indicate that a record has been created for a given row in the input data in case the submission process gets interrupted part way. The column name for storing the sysid of submitted records can be changed by defining a __SYSID__ entry in the return_fields.
Once both the struct and format YAML files have been generated for the incident table, SNulk can be used to submit data to the table. Follow the steps below to submit test data to the incident table on a developer instance of ServiceNow. The steps below use SNulk’s CLI to perform the submission. However, except for step 3, the overall submission process is the same when using SNulk as a Python library. More information on how to use SNulk as a Python library can be found in the Readme file in SNulk’s GitHub repo.3 Additionally, the test data and YAML files referenced in this section are the files used/generated in the previous sections. Examples of the test data spreadsheet, the struct YAML file, and the format YAML file can be found in the SNulk Github repo example directory.4
-
Install SNulk from PyPI using the command below. Note other options for installation are listed on the SNulk Github repo Readme file.3
pip install SNulk -
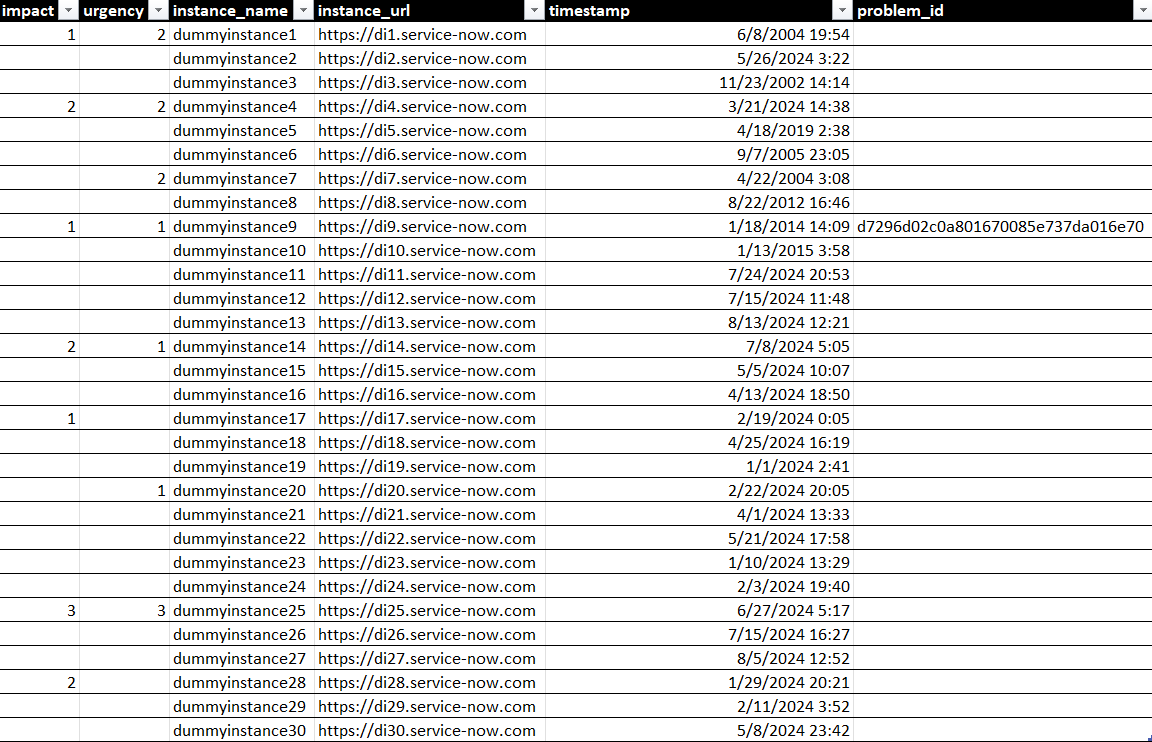
Grab the data that will be used during the SNulk submission process. The data being used in this example submission can be found in the SNulk Github repo and is displayed below.6
-
Run SNulk to submit the input data to the table on the ServiceNow instance. The command below submits data from
test_submit.xlsxto theincidenttable of a ServiceNow developer instance. In the command below,-tis the path to a directory housing thestructandformatYAML files. The directory should contain two subdirectories,structandformat, which contain the associated files. The-noption specifies theshort_nameof theformatYAML file that will be used during this submission. The-ioption specifies the path to the input data file. Lastly, the-uand-poptions specify the username and password to be used during basic authentication to the ServiceNow instance. Additional options, including additional authentication options, can be found in the SNulk Github repo Readme file.3# Avoid recording password in command history echo -n "Enter password:"; read -s password # SNulk command snulk -t example/submit_table -u user -p "$password" -n test_incident -i example/data/test_submit.xlsx # Clear the password variable unset password -
After running SNulk, the input data file will be modified to include at minimum the SysID of each submitted record. For the command above, the
example/data/test_submit.xlsxwill have been modified to look like the below image. Note the creation of the two newIncident SysIDandIncident Numbercolumns which were filled by retrieving data from the ServiceNow table after creating the record. These match thereturn_fieldsdefined in theformatYAML file of the previous section. If all records were submitted correctly, all entries inIncident SysIDshould be filled with theSysIDsof the submitted records.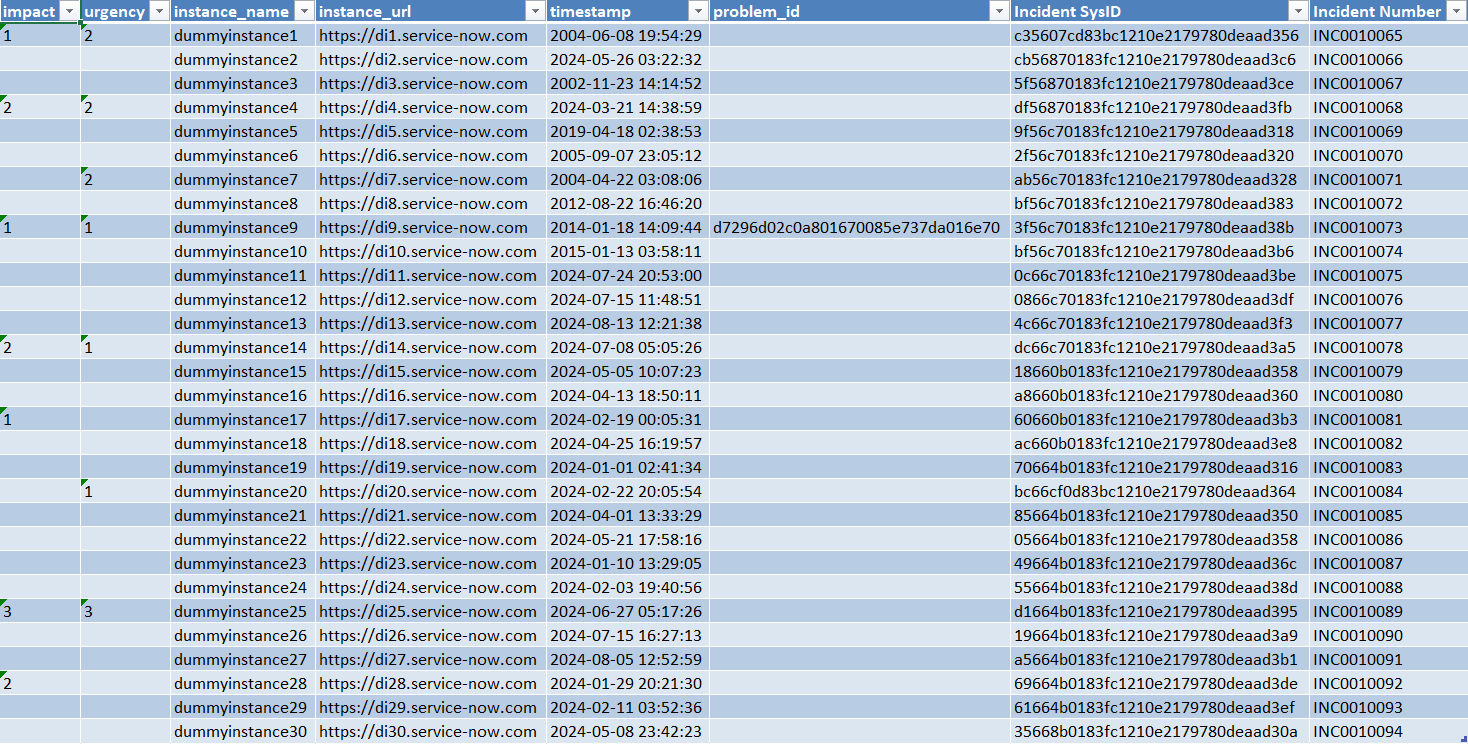
-
A successful submission can also be confirmed by going to the list view of the table and checking for the submitted records. The list view of the
incidenttable displayed below shows some of the submitted records. The remaining records are on the second page of the list view.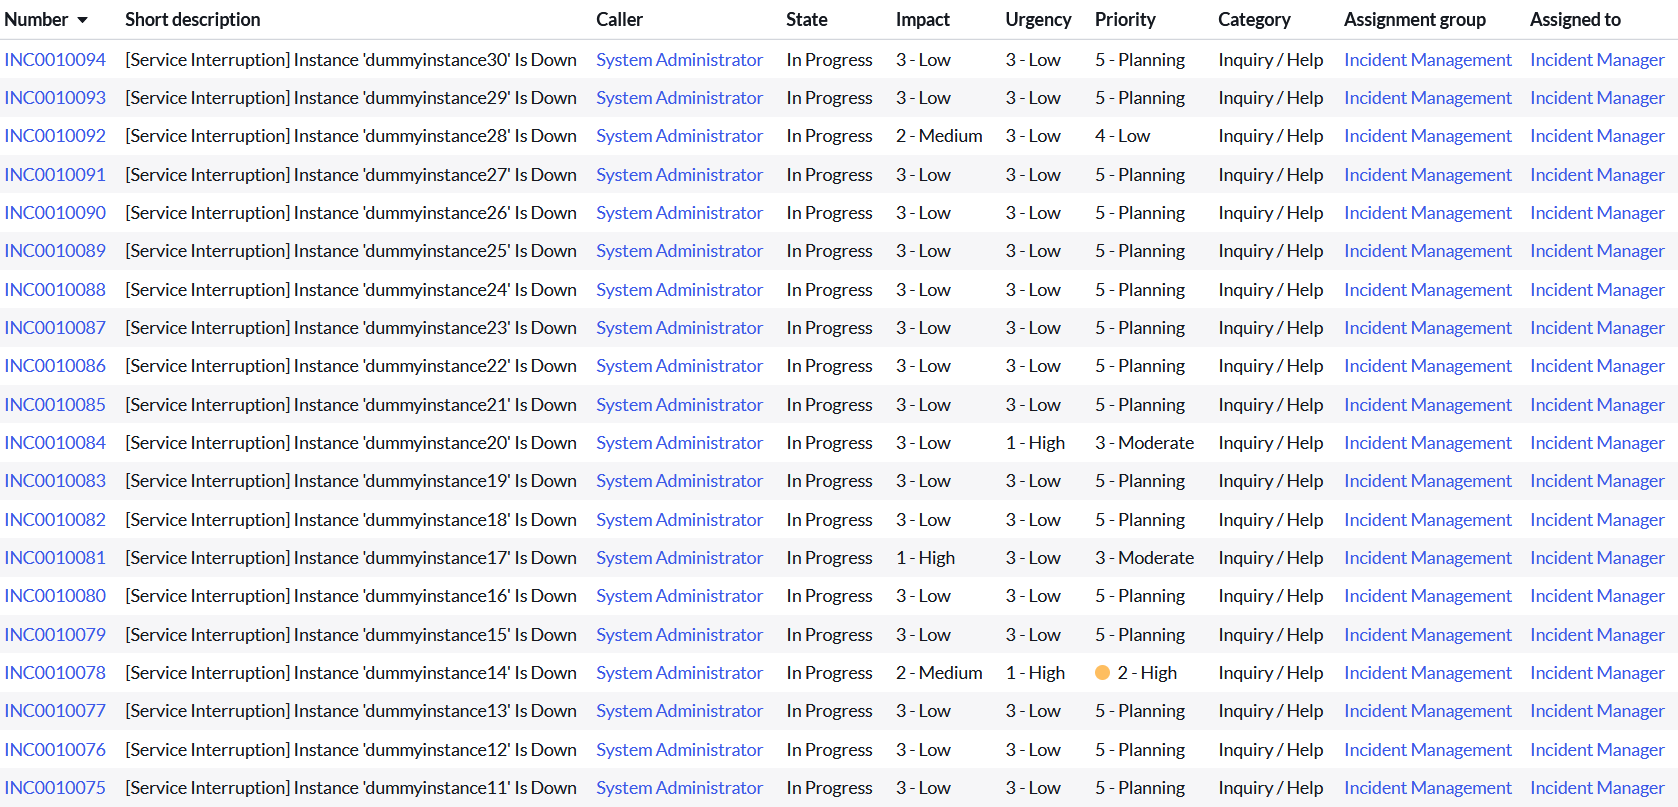
-
Finally, by examining a submitted record, one can see that the
formatYAML file was applied successfully. The image below displays the record for the first row of the input data fromexample/data/test_submit.xlsx. Here we see that all input data has been successfully mapped to the table fields, default values have been applied, substitutions have been successful, and a hash of the submitted data has been included.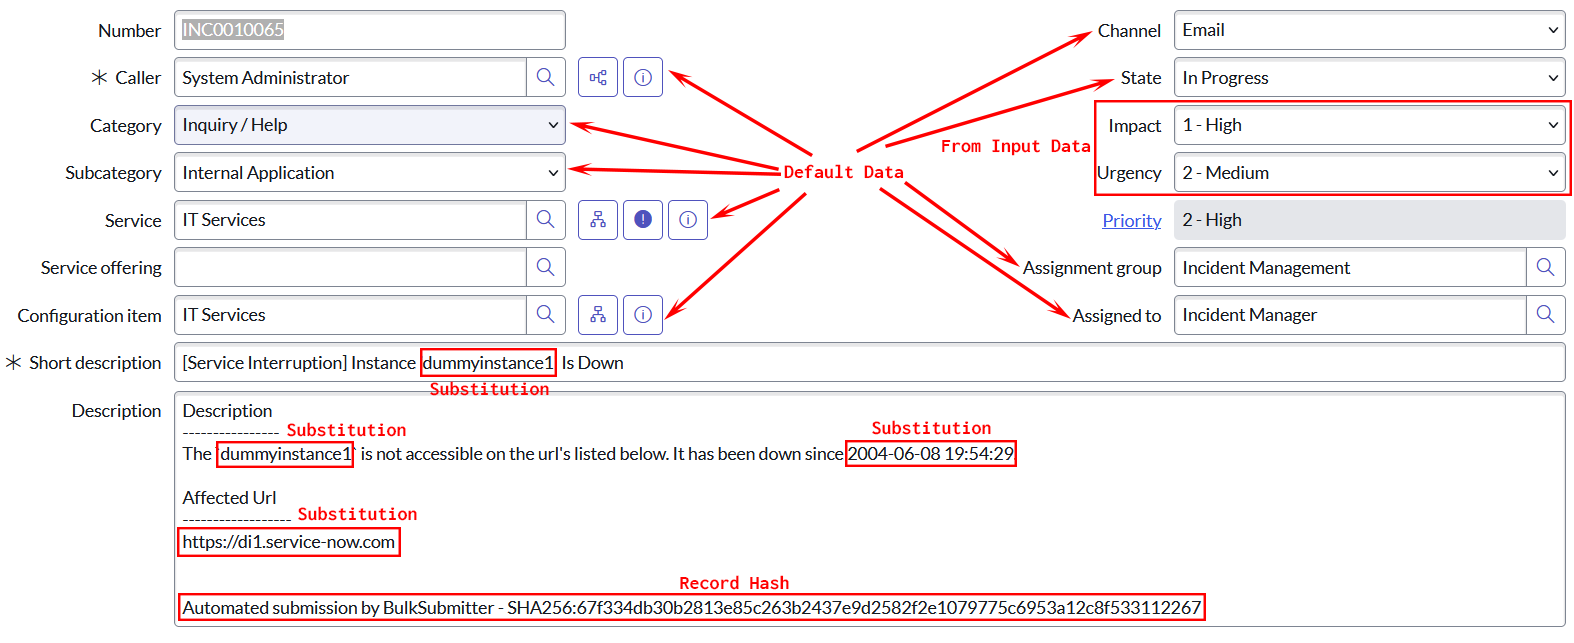
Conclusion
As shown, SNulk, the ServiceNow Bulk Submit Tool for Table Records, provides a solution to the problem of needing to automate the submission of large numbers of templated records to a table on a ServiceNow instance. SNulk can be run by a simple command or as a Python library, and used to create any number of new table records from a combination of templates and input data. Unlike the GUI import option of ServiceNow instances, SNulk is designed to aid users in scripting and automation efforts where limited user interaction is required. Further still, the templates required by SNulk are easily defined, readily customizable, reusable, and intended to be modified to fit the use case of users. More information about SNulk and its uses can be found on the SNulk Github repo.3
-
https://github.com/ServiceNow/SNulk/blob/main/README.md ↩ ↩2 ↩3 ↩4 ↩5 ↩6
-
https://github.com/ServiceNow/SNulk/tree/main/example/submit_table/struct/dev_incident.yaml ↩
-
https://github.com/ServiceNow/SNulk/blob/main/example/data/test_submit.xlsx ↩ ↩2 ↩3
-
https://github.com/ServiceNow/SNulk/blob/main/example/submit_table/format/test_submit.yaml ↩